Configuring auto attendant scripts
Auto attendant script is a simple collection of voice menus, submenus and announcements and actions defined for each of them according to the caller's behavior. It can:
- connect to an extension or voicemail,
- play an announcement,
- navigate through menus and submenus.
- send any faxes to a configured email.
Menus can be recorded in various formats. Kerio Operator supports the following formats:
| Supported formats | Audio format |
|---|---|
| gsm | 8KHz |
| wav | 8KHz, 16 bits per sample, mono (Kerio Operator encodes all WAV files into this format automatically) |
Kerio Operator — supported audio formats
How to add new auto attendant script
See the following description of an auto attendant script as an example. Create a script which:
- starts after dialing extension 200,
- contains a voice menu with the following text: LOL! You have just reached the Live And Let Laugh company's hotline (fiendish laugh).
- For Sales Department, press 1.
- For Quality Assurance Department, press 2.
- For Technical Support Department, press 3.
- If you wish to speak to the receptionist, press 4.
The Sales Department manages two flagship products of the company. Therefore, two submenus (Joke Lite, Laugh Home 2012) are created.
- For Joke Lite, press 1.
- For Laugh Home 2012, press 2.
- If you wish to talk to the receptionist, press 3.
Create the same menu for technical support.
Before creating the script, it is necessary to create extensions (in the assigned range 123456XXX) which will be used in the script.
- extension 100 — reception of Live And Let Laugh Inc. One of the receptionists Joan Giggle or Brian Snigger will connect the calls if the caller makes no selection from the menu.
- extension 203 — Quality Assurance Department extension (David Jester).
- extension 301 — common extension (you can create a call queue or a ringing group) for Joke Lite experts, such as Frederic Jovial, George Funpoker, Anne Kdotte.
- extension 302 — common extension for Laugh Home 2012 experts (Tamara Bellylaugh, Otto Spass, Mary Merry).
- extension 501 — call queue for Joke Lite technical support (Andrew Widegrin).
- extension 502 — call queue for Technical Support of Laugh Home 2012 (Alan Tickle).
Script settings
Configure the script in the administration interface in section Configuration > Auto Attendant Scripts:
Auto Attendant
- Click Add and enter the Script
extension (extension
200in our example) and some description. - (Optional) To receive faxes to configured email address, select Detect faxes and send them by email to and type an email address.
- Click Edit and open the Edit Menu dialog.
- In the Announcement field, select the recording for the main script. The Select button offers existing recordings or you can upload your own announcement to the PBXPrivate Branch Exchange - System that connects telephone extensions and switches calls..
NOTE
If you open the administration interface in Safari browser and you cannot play any recordings, read topic Cannot play voicemails or audio files in Safari.
- Set Number of playbacks to two which will ensure the menu is played to the caller twice.
- Once the announcement is played, timeout is started with the default action taken upon its expiration. Set the timeout to 10 seconds. The default action is the preset hang up action. This means that if the announcement is played twice and the customer does not make any selection within 10 seconds, the call will be terminated.
- Click Add. The Key column states the key which confirms the customer's choice. Enter number 1. Enter 1 in this column. Column Action defines what happens when the caller presses a key on their phone. Select Go to submenu. We need to direct calling customers to the extension of the product they are interested in (either Joke Lite or Laugh Home 2012). In the Announcement column, you can add a record which will be played upon pressing the particular key (for example: Stay tuned, now you will be redirected to the Live And Let Laugh Inc Sales Department). Finish the table according to figure.
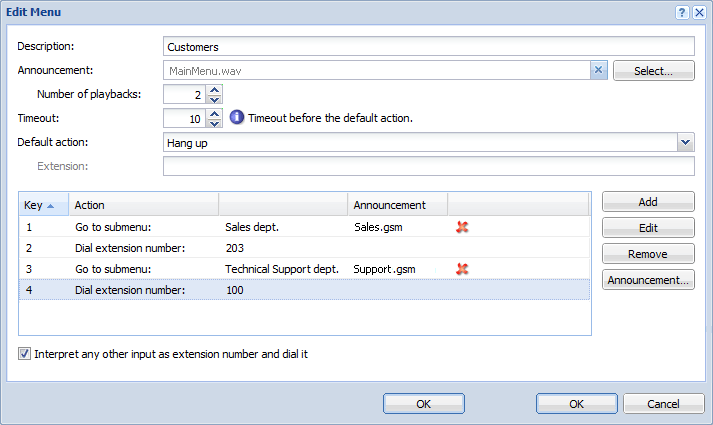
Editing main menu
- Check Interpret any other input as extension number and dial it. This option allows to specify a direct extension while the auto attendant script is running.
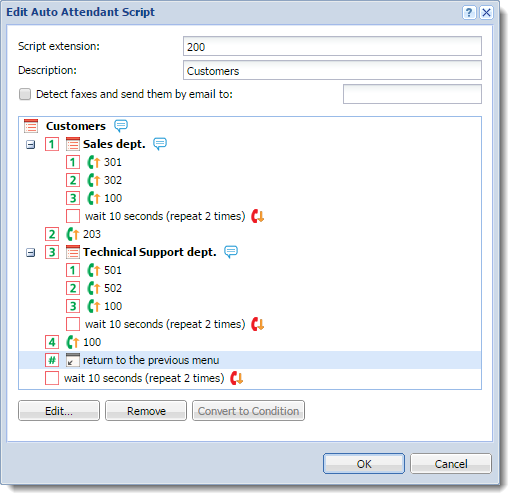
- Confirm the settings and return to the Add Auto Attendant Script dialog which is now similar to the one in picture above.
- Click on menu Sales dept.. Again, the Edit menu dialog is opened but now the menu is for the Sales department. Follow the same procedure as with the main menu. The resultant menu will look as the one showed in the picture below.
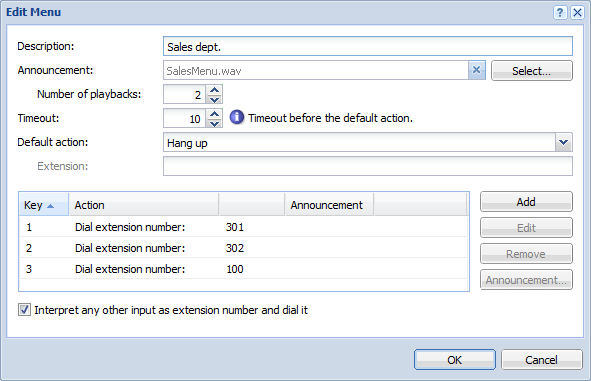
Submenu edit
- Do the same for the Technical Support dept. menu.
Now the script is complete.
NOTE
You can duplicate an existing script if you want to create a similar one — select a script and click Duplicate.
Time condition
The script can be limited to a specific time interval (office hours of your employees or night time when no call queue agents are available).
The time ranges (intervals) are configured in section Configuration > Definitions > Time Ranges. Once you have the time range configured, go back to the Add Auto Attendant Script, select the menu you wish to limit and click on the Convert to Time Condition button.
Instructions for time condition setting will be better understood through the following example focusing company's working hours. Sales department works from 9am to 5pm on weekdays. Configure the auto attendant script so that when customers call during office hours they will be connected to a sales department employee and when they call before or later they will hear a message announcing that the sales department is closed. To create the condition script, follow these instructions:
- In the administration interface, go to Configuration > Definitions > Time Ranges.
- Click Add. Dialog Add Time Range opens.
- In section Add to a group, select the
Create new option and enter a name for the new
interval (for example,
Sales Department Office Hours). - The Description is optional, for example Weekdays from 9am to 5pm.
- Select
dailyin the Type menu and set the desired interval from 9 to 5 in the From and To fields. - In the Valid on menu, select Weekdays.
- Click OK to confirm the changes.
- Open the Configuration > Auto Attendant Scripts section.
- Click on Add.
- In the Add Auto Attendant Script dialog, create a corresponding menu (the script created in the previous section will be used in this example — see the picture below).
- Select the Sales Department submenu and click Convert to Time Condition.
- Divide the Sales Department submenu in two time conditions. The first one is played if the condition is met and the second if the condition is not met. Click on the red highlighted text Set up the time condition.
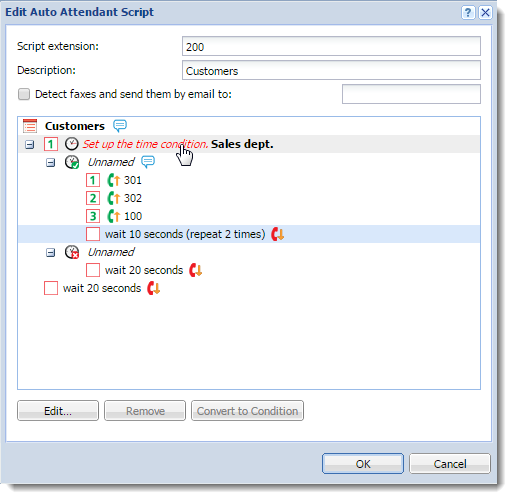
Setting the time condition
- This opens dialog Edit Time Condition. In the For time range menu, select Sales Department Office Hours.
- Click on the submenu representing the positive result of the
condition. It is currently called Unnamed. In the dialog
Edit Menu just opened, simply add a description (for
example
Sales Department condition met). - Click on the submenu representing the negative part of the condition (now it is empty and unnamed).
- This opens dialog Edit Time Condition allowing to add a description (for example, Sales Department — condition not met).
- Now you can modify the script. For example, in the Announcement field, add a message announcing that office hours of the Sales Department are from 9am to 5pm on weekdays.
- Save the submenu. The resultant script is displayed in the next picture.
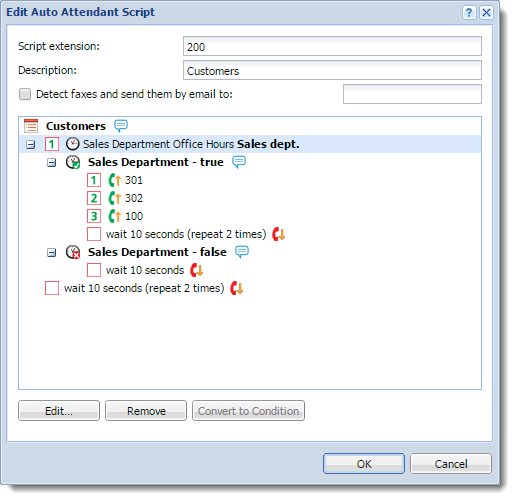
Time condition applied in the script