Configuring IPsec VPN tunnel with Astaro
This article covers the configuration details necessary to establish a site to site VPN tunnelKerio Control includes a VPN tunnel which allows to distributed offices to interconnect their offices securely. between an Astaro firewall, and Kerio Control. The tested configuration involves IPsecInternet Protocol security - A network protocol used to encrypt and secure data sent over a network. with a pre-shared key.
Before configuring a new VPNVirtual private network - A network that enables users connect securely to a private network over the Internet. tunnel, you will need the defined hostname of the Astaro system, located under System Settings > Hostname.

Configuring hostname in Astaro
There are two steps to connect Astaro firewall and Kerio Control IPsec VPN:
Step 1: Configuring Kerio Control
- To configure Kerio Control:
- Open the Kerio Control web administration.
- Go to Configuration > Interfaces.
- From the bottom, choose Add > VPN Tunnel... Make sure the tunnel type is set to IPsec.
- Define the qualified hostname of the Astaro firewall as the Active endpoint.
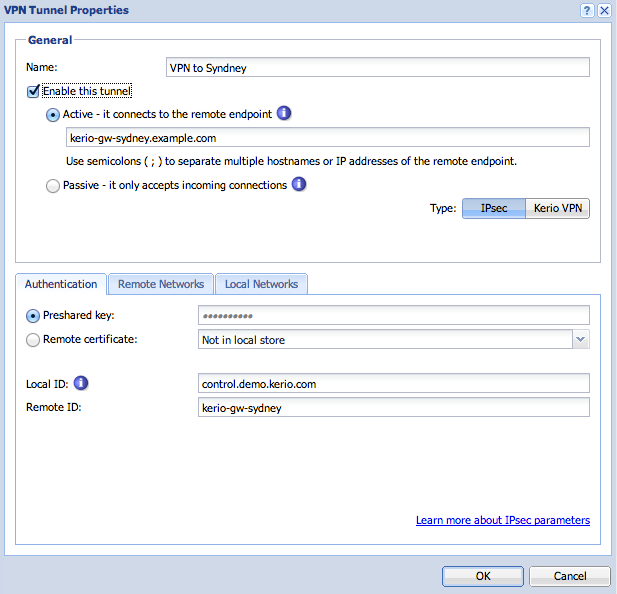
Adding a preshared key
- In the Authentication section, define a pre-shared key, and input the hostname of the Astaro gateway under the Remote ID. This should match exactly as it appeared in the Astaro configuration.
- Take note of the Local ID. This value will be used when configuring the tunnel parameters in Astaro.
- In the Remote Networks section, define all subnets which are located behind the Astaro gateway.
Step 2: Configuring Astaro firewall
To configure Astato:
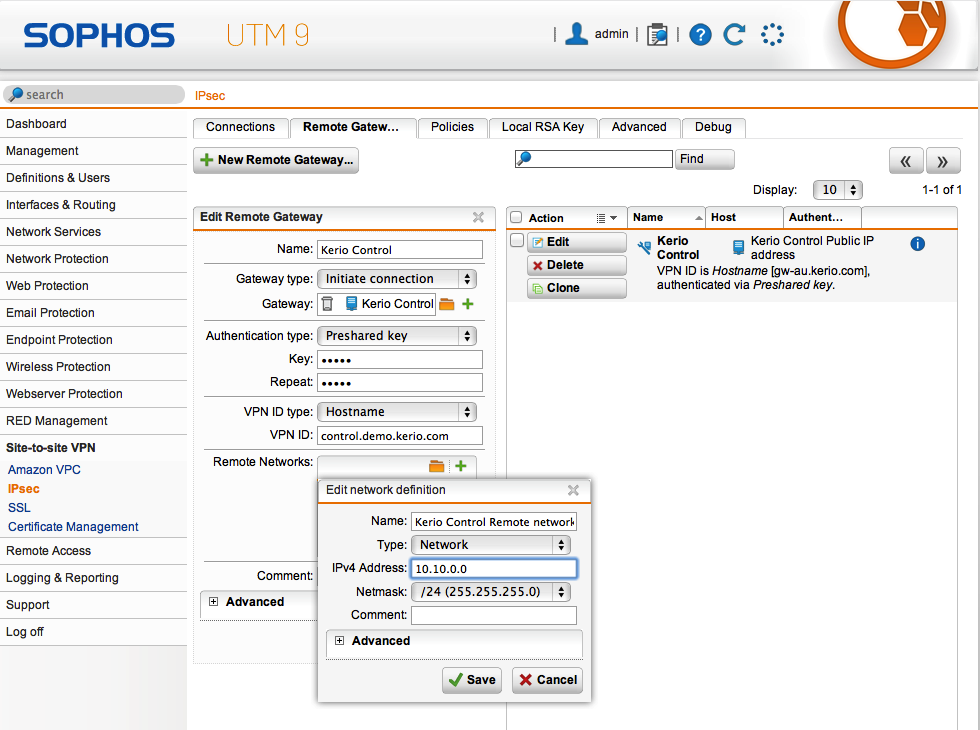
- From the Astaro administration, go to Site-to-site VPN > IPsec.
- In the Remote GatewayNetwork element that connects networks and shows packets where to go. section, create a New Remote Gateway. Assign a name.
- For the Gateway type, choose Initiate connection, and add the remote host of the Kerio Control gateway.
- For the authentication type, choose Preshared key, and input the same value inputted into the Kerio Control tunnel properties.
- For the VPN ID type, choose Hostname, and input the value which Kerio Control provided under the Local ID field of its VPN tunnel properties.
- In the Remote Networks dialog, add the IP subnets that are located behind the Kerio Control firewall.
IMPORTANT
The Remote Networks defined in each tunnel should not overlap in scope. Otherwise, it may disrupt routing over the tunnel.
Editing network definition
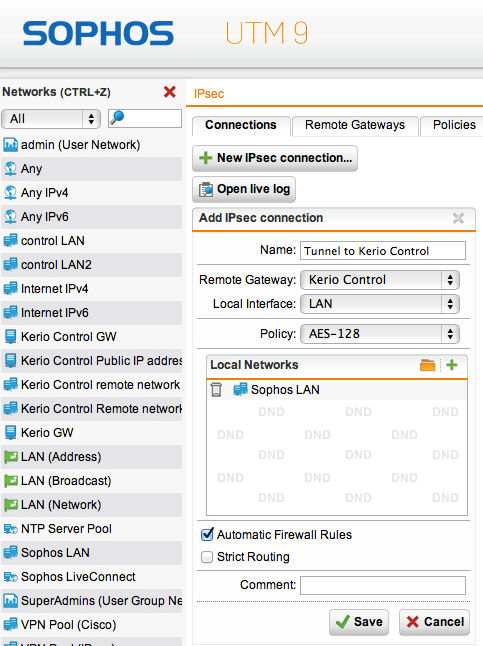
- In the Connections section, create a New IPsec connection....
Configuring IPsec connection
- Enter the following information:
| Field | Description |
|---|---|
| Name | Fill the Assign a name to the tunnel. |
| Remote Gateway | Assign the Remote Gateway which was created in the previous step. |
| Local Interface | Assign the local interface you want to access from the remote network via the tunnel. |
| Policy | Assign the policy AES-128. |