DHCP server in Kerio Control
Kerio Control includes a DHCPDynamic Host Configuration Protocol - A protocol that automatically gives IP addresses and additional configuration to hosts in a network. server. The DHCP server assigns clients IP addresses within a predefined scope for a certain period (lease time). If an IP addressAn identifier assigned to devices connected to a TCP/IP network. is to be kept, the client must request an extension on the period of time before the lease expires. If the client has not required an extension on the lease time, the IP address is considered free and can be assigned to another client. This is performed automatically and transparently.
So called reservations can be also defined on the DHCP server — certain clients will have their own IP addresses reserved. Addresses can be reserved for a hardware address (MAC) or a host name. These clients will have fixed IP address.
Kerio Control also allows automatic configuration of the DHCP server. This option involves automatic creation and updates of IP address ranges and parameters in accordance with network interfaces included in groups Trusted/Local Interfaces, Guest Interfaces and Other Interfaces. This implies that the only thing to do is actually to run the DHCP server.
Automatic configuration of scopes
By default, the DHCP server works in the mode of automatic configuration of scopes.
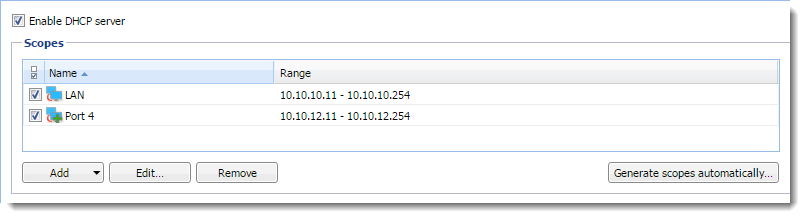
- In the administration interface, go to DHCP Server.
- Select option Enable DHCP server.
- Click Apply.
For each interface's subnet, a scope of the following parameters will be created:
- Range — by IP address of the interface
and the corresponding subnet mask.
The range should cover the particular subnet with free resources
for assigned static addresses (e.g. for mask
255.255.255.0, the range fromx.x.x.11tox.x.x.254will be created). If an interface's address is covered by a range, then an exception is automatically defined for it. - Subnet mask — according to the particular interface.
- Default gateway — IP address of the particular interface.
- DNSDomain Name System - A database enables the translation of hostnames to IP addresses and provides other domain related information. server — IP address of the particular interface.
NOTE
Kerio Control does not ping an IP address before assigning it via DHCP. Ensure that there are no static addresses assigned to any network devices which are also configured in the DHCP range.
Manual definition of Scopes and Reservations
If you do not want to use the automatic configuration of IP ranges, you can switch to the manual mode. However, bear in mind that changes of interfaces in group Trusted/Local Interfaces, Guest Interfaces and Other Interfaces (e.g.: adding of a new interface, change of IP address, etc.) require manual update of address scopes defined in the DHCP server.
Only one scope can be defined for each IP subnet.
NOTE
In the administration interface, it is also possible to use a scope template where parameters are already predefined in accordance with the particular firewall's interface. For details, see above, section Automatic configuration of scopes.
- In the administration interface, go to DHCP Server.
- Click on the Click to configure scopes manually link and confirm the change.
- Click Add > Manual.
NOTE
You can use Add > Use Interface Template, where parameters are already predefined in accordance with the particular firewall's interface.
- In the Add Scope dialog, type a name of the new scope.
- Define the first and the last address of the scope.
NOTE
If possible, define the scope larger than it would be defined for the real number of users within the subnet.
- Type a mask of the appropriate subnet.
- In table DHCP Options, click Add.
- Select option 003: Default GatewayNetwork element that connects networks and shows packets where to go. and type an IP address. Save it.
- Select option 006: DNS server and type an IP address where Kerio Control is running. You can type any DNS server (or more DNS servers separated with semicolons). However, it is recommended to use the Kerio Control host's IP address as the primary DNS server (i.e. at the top). The DNS module can cooperate with DHCP server so that it will always use correct IP addresses to respond to requests on local host names.
NOTE
DHCP protocol enables adding several optional parameters, such as:
015: Domain name — local Internet domain (not to be used for specification of Windows NT domain name).
066: TFTP server name — name or IP address of a TFTP server. TFTP protocol is used by Kerio Operator to autoconfigure telephones.
- Save the DHCP parameter.
- To create more individual scopes, click Exclusions. For more information refer to Defining individual scopes.
- Save the settings.
- If you need other scopes, repeat this procedure from step 3.
- Select option Enable DHCP server.
Defining individual scopes
Kerio Control enables the administrator to define only one scope within each subnet. To create exclusions from this scope (for example for a group of servers with static IP addresses), follow these instructions:
- In the Edit Scope dialog, click Exclusions.
- In the Exclusions dialog, click Add.
- Add From and To IP addresses.
NOTE
Create the scope from 192.168.1.10 to
192.168.1.100 and click on the
Exclusions button to define the scope from
192.168.1.50 to 192.168.1.60. These
addresses will not be assigned by the DHCP server.
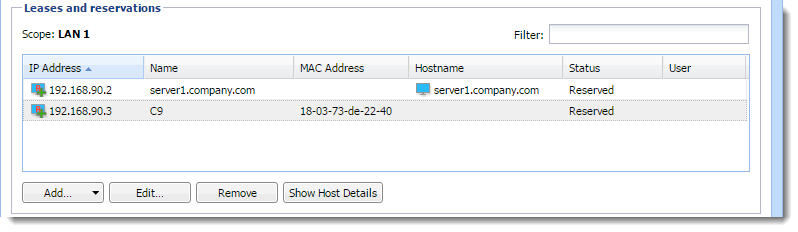
Leases and Reservations
Scopes can be viewed in the Leases and reservations table.
Using the Remove button you can release the selected IP address and/or cancel IP address reservation on the spot. DHCPRELEASE control message will be sent to the corresponding client.
Reserving an IP address
DHCP server enables you to book an IP address for any host or MAC address. Reservations can be set in both scope configuration modes, manual and automatic. The act of adding a reservation in the automatic mode does not switch to manual mode.
Any IP address included in a defined subnet can be reserved. This address can (but does not have to) belong to the scope of addresses dynamically leased, and it can also belong to any scope used for exceptions.
Adding reservations
- In the administration interface, go to DHCP Server.
- In the Leases and reservations table, click Add > Add Reservation.
- Type a name of the reservation.
- Select MAC addressMedia Access Control Address - A unique identifier that specifies a device in a network. or hostname for device identification and type the identification.
- Type a reserved IP address.
- Click OK.
If you want to check your settings, icons marked with
R represent reserved addresses.
Making a DHCP reservation in Active Hosts
You can reserve an IP address for a MAC address without typing it, if Kerio Control is able to see the MAC address of the host:
- In the administration interface, go to Status > Active Hosts.
- Select a host.
- Right-click on the selected user and click Make DHCP Reservation by MAC. Kerio Control opens a window with information about the new configuration.
- Click OK.
DHCP server of Kerio Control reserves the MAC address, if the DHCP server in Kerio Control is enabled and a scope of IP addresses is created on the interface.
IMPORTANT
If you use Kerio Control MAC Filter, check the Also permit MAC addresses used in DHCP reservations or automatic user login option. For more information refer to Filtering MAC addresses.
Reserving leases
- In the administration interface, go to DHCP Server.
- In the Leases and reservations table and click (highlight) the desired device with leased address.
- Click Add > Reserve lease.
- In the dialog, click OK.
If you want to check your settings, in the Status column appears Reserved, Leased.