Configuring SSL certificates in Kerio Connect
To secure Kerio Connect by SSLSecure Sockets Layer - A protocol that ensures integral and secure communication between networks./TLSTransport Layer Security - A follower of the SSL protocol and ensures secure communication between networks. encryption, you need an SSL certificateSSL certificates are used to authenticate an identity on a server.. SSL certificates authenticate an identity on a server.
Kerio Connect creates the first self-signed certificate during the installation. Upon the first login, users must confirm to go to a page which is not trustworthy. To avoid this, generate a new certificate request in Kerio Connect and send it to a certification authority for authentication.
You can have one or more certificates for each domain configured in Kerio Connect.
NOTE
If you want to use an existing SSL certificate from another service, export the existing SSL certificate and the public key in the PEM format and import them to Kerio Connect.
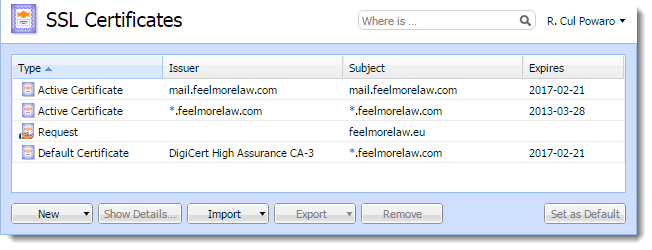
Manage certificates in the Configuration > SSL Certificates section.
NOTE
To make the communication as secure as possible, you can: Disable all unsecured services or set an appropriate security policy
Supported certificates
Kerio Connect supports certificates in the following formats:
- Certificate (public key) — X.509 Base64 in text format (PEM).
The file has suffix
.crt. - Private key — the file is in RSA format and it has suffix
.keywith 4KB max.
Multiple certificates
Since Kerio Connect 9.0.2, you can import certificates for different domains to Kerio Connect. Kerio Connect then selects and uses the appropriate certificate.
If multiple certificates exist for a single domain, Kerio Connect selects a certificate according to the following order:
- Trusted certificate for the domain hostname.
- Self-signed certificate for the domain hostname.
- Valid certificate for the domain hostname.
- Expired certificate for the domain hostname.
- Trusted wildcard certificate.
- Self-signed wildcard certificate.
- Valid wildcard certificate.
- Expired wildcard certificate.
- Default server certificate.
NOTES
- If a certificate expires and you have already imported a new valid certificate to Kerio Connect for the same domain, delete the old certificate or restart the server to use the new valid certificate.
- If you have multiple intermediate certificates, add them one by one to the server certificate file.
Creating certificates
Creating self-signed certificates
To create a self-signed certificate, follow these steps:
- Go to section Configuration > SSL Certificates.
- Click on New > New Certificate.
- Fill in the information.
- Click OK.
To enable the server to use this certificate, select the certificate and click on the Set as Default button (Set as Active in older versions).
Creating certificates signed by a certification authority
To use a certificate signed by a trustworthy certification authority, you must first generate a certificate request, send it to a certification authority and import a signed certificate upon receiving it.
- Open section Configuration > SSL Certificates and click on New > New Certificate Request.
- Fill in the information and save.
- Select the certificate and click on the Export > Export Request button.
- Save the certificate to your disk and send it to a certification authority.
Once you obtain your certificate signed by a certification authority, click on Import > Import Signed Certificate from CA.
NOTE
If your certificate authority uses intermediate certificates, follow the steps in intermediate certificates before importing the certificate.
To obtain your certificate:
- Go to section Configuration > SSL Certificates.
- Click on Import > Import Signed Certificate from CA.
- To enable the server to use this certificate, select the certificate and click on the Set as Active button.
Intermediate certificates
Kerio Connect allows authentication by intermediate certificates. To make authentication by these certificates work, follow these steps to add the certificates to Kerio Connect:
- In a text editor, open the server certificate and the intermediate certificate.
- Copy the intermediate certificate below the server certificate into the server certificate file (
*.crt) and save. The file may look like this:
-----BEGIN CERTIFICATE-----
MIIDOjCCAqOgAwIBAgIDPmR/MA0GCSqGSIb3DQEBBAUAMFMxCzAJBgNVBAYTAl
MSUwIwYDVQQKExxUaGF3dGUgQ29uc3VsdGluZyAoUHR5KSBMdGQuMR0wGwYDVQ
     ..... this is a server SSL certificate ...
ukrkDt4cgQxE6JSEprDiP+nShuh9uk4aUCKMg/g3VgEMulkROzFl6zinDg5grz
QspOQTEYoqrc3H4Bwt8=
-----END CERTIFICATE-----
-----BEGIN CERTIFICATE-----
MIIDMzCCApygAwIBAgIEMAAAATANBgkqhkiG9w0BAQUFADCBxDELMAkGA1UEBh
WkExFTATBgNVBAgTDFdlc3Rlcm4gQ2FwZTESMBAGA1UEBxMJQ2FwZSBUb3duMR
     ..... this is an intermediate SSL certificate which
           signed the server certificate...
5BjLqgQRk82bFi1uoG9bNm+E6o3tiUEDywrgrVX60CjbW1+y0CdMaq7dlpszRB
t14EmBxKYw==
-----END CERTIFICATE-----
- Save the settings.